Matic Magister
Jun 29, 2026
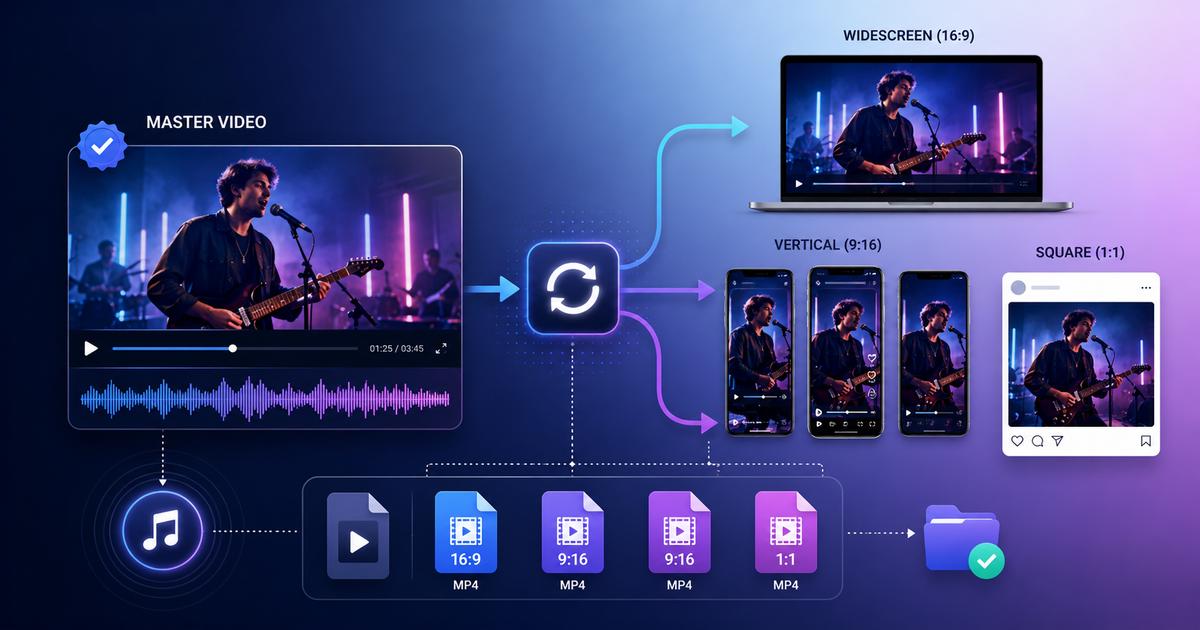

Once the final cut is approved, the export work is still unfinished. The same master file has to be exported into multiple upload-ready copies with different frame shapes, resolutions, codecs, and file size limits. If you batch convert music videos, you can efficiently convert videos for multiple platforms like YouTube, TikTok, and Instagram, with output rules set once and checked across the folder before upload.
Platforms do not judge a video by the extension alone. A file named .mp4 can still fail if some settings or duration are outside the accepted range. That is why video format conversion needs to cover more than just the file extension. YouTube’s recommended upload settings, for example, separate format, codec, bitrate, resolution, aspect ratio, and audio settings.
Aspect ratio creates the most visible problems. YouTube long-form uploads usually use 16:9. TikTok, Reels, and Shorts use a vertical 9:16 frame. The placement in feeds could be either 1:1 or 4:5 ratios. Social media formats come with interfaces, where subtitles or the name of the artist at the edges might get covered with interface icons.
The resolution and file sizes vary by the destination channel. A high-resolution file in 4K is going to take much time for upload and even fail to load in an ad manager or is severely compressed by the platform itself.
Converting manually becomes more complicated after some iterations. With multiple tracks, clean versions, lyric versions, and teasers, errors can quickly accumulate.
Batch video conversion helps to cut down on repetitive work. Instead of setting up all the options from scratch each time, you just have to set them once, and then follow the same pattern when converting other videos. You specify one output format, resolution, codec, audio quality and bitrate, target directory, and other settings.
A bulk video converter helps speed up the music video distribution workflow while also improving file organization through consistent naming and folder structures. For example, your files could carry information about their intended use (platform), aspect ratio, or resolution. This would minimize the chances of accidentally uploading the wrong file, and also make it much simpler to check out all the variations of your video.
Use the final version of the music video as the source file. It should already have the final color, sound, titles, captions, and ending. Do not use a small social export as the source unless no better file exists. A compressed file loses more detail after another conversion pass.
For music video distribution, keep two folders. Store the full-quality file in Masters and every upload copy in Platform Exports. Use names that identify the artist, track, version, etc.
Write the delivery set before you open the converter. One release may need a wide YouTube upload, a vertical chorus cut, a square teaser, a clean version, and a smaller MP4 for a partner portal or email campaign. If the release includes paid promotion, add those files to the list as separate export targets.
For each copy, write the destination in plain language: YouTube full video, TikTok teaser, Reels cut, feed post, distributor file. Then add the frame shape and resolution next to it. This keeps the queue tied to the upload plan, not to random export names.
Open the converter. For example, Movavi software lets you batch convert in a flash and has a simple user-friendly UI. Add the master files or approved edits.
If you’re preparing several songs, add them together. If one song has several versions, keep them named clearly so the full video, teaser, lyric edit, and clean version do not get mixed.
Remove duplicates before conversion. A repeated file can create two similar exports, and that makes the finished folder harder to review.
MP4 files are used for social content while MOV appears for label, archive, or production demands. In cases where there is no specific need to format files, follow the rules provided by the uploading site.
Quality varies depending on the kind of file you are going to upload – whether it is a 4K YouTube upload or just a small file such as an ad copy or a newsclip snippet.
Crop preview should be done first; do not evaluate the frame based on the still image. Even though music video may look nice at the beginning, it may be awful as the camera pans and subtitles start to show up.
Vertical frames need to be evaluated at their chorus or at the point when there is activity in the video. All movements need to stay within the center while also allowing room for the app’s subtitles, buttons, username, and audio tags. For square and 4:5 frames, evaluate any shot that involves camera panning or group choreography.
File size depends on the duration and bitrate. A three-minute vertical clip recorded in 1080p can either pass the size limit at 8 Mbps and fail at 40 Mbps.
Adjust your bitrate depending on resolution and motion. Scenes that include fast cuts, lighting effects, smoke, water, and grain require more bitrates compared to a stationary acoustic performance. For 1080p social posts, a good starting bitrate range could be 8 Mbps – 16 Mbps.
If a platform has a strict cap, calculate the target. Convert the file size to megabits, divide by duration in seconds, then subtract the audio bitrate. The result is your video bitrate ceiling.
Before running the converter, set the output directory and naming convention. Make sure there is no need to specify the extension because it could cause uploads to fail.
Start the queue and convert multiple videos at once, then review the finished folder as a delivery package rather than checking files at random.
Open at least one vertical copy on a phone. Watching videos on a desktop won't reveal how the video appears when viewed on top of buttons, usernames, and captions. If something is off, adjust the preset and rerun that version from the master.
Batch conversion becomes crucial only after the first wave of uploads. If the release plan changes later, you can return to the saved master and export only the version you need.
Make sure you retain the master copy, maintain your presets, and properly title the outputs, making it clear where each of them should be uploaded. This will allow you to simply convert the required file next time around, without ever needing to edit the file again.
This is how music video distribution should be organized — with a master file, platform-specific versions, and a clear conversion plan.
Source of music data: Viberate.com
-
📌 Viberate Analytics gives you the data behind the music industry. Built for A&R teams, managers, labels, and artists, it helps you find new talent, analyze audience insights, track Spotify playlists and stats, evaluate tracks and songs, and monitor Spotify, YouTube, streaming, and radio airplay analytics — all connected in one system.
11M+ artists, 100M+ songs, 19M+ playlists, 6K+ festivals and 100K+ labels on one platform, built for industry professionals.